Upcoming Webinar | Dec. 17 | Serial Compresstome Vibratome Sectioning for Brain Mapping

Help and FAQs

 We’ve put together this comprehensive tissue sectioning resource hub to help you master the art of tissue sectioning. Find a wide range of tools, guides and materials to help you in your research.

What is a Compresstome?

Precisionary Instruments Compresstome® tissue slicers are a type of vibrating microtome, otherwise known as a vibratome. We call ours the Compresstome® because our models utilize a patented compression technology that no other tissue slicer on the market possesses. This technology is found in the way our slicers are designed (cutting vertically as opposed to horizontally) and more importantly, in our specimen tubes.

The specimen tube is the stage for your sample to be cut when using the Compresstome®.It is a two-part system consisting of an inner plastic plunger and an outer metal tube. The metal tube has a slightly indented, compression lip at the one end of the tube and this is what is gently compressing your agarose-embedded sample as it exits the tube to be cut.

Your sample sits on the plastic plunger and gets pulled down within the metal tube to then be embedded with a low-melting agarose. The agarose is then chilled with a Compresstome® chilling block and the agarose assists with the compression technology. As the agarose-embedded sample exits the tube, the blade comes down and makes a cut right at that site of compression. This is how the Compresstome® creates even, consistent slices every time you cut.

What are the general steps for using the Compresstome to make tissue sections?

Your sample sits on the plastic plunger and gets pulled down within the metal tube to then be embedded with a low-melting agarose. The agarose is then chilled with a chilling block and the agarose assists with the compression technology. As the agarose-embedded sample exits the tube, the blade comes down and makes a cut right at that site of compression. This is how the Compresstome® creates even, consistent slices every time you cut.

What are the best cutting parameters to use for cutting speed and oscillation frequency?

The best cutting parameters to use for cutting speed and oscillation frequency are:

  • Cutting speed: 1 to 2 (the “Advance” knob)
  • Oscillation frequency: 3-4

These parameters work best for cutting fixed tissue, and will not yield any chattermarks! If these parameters do not suit your needs, contact us today! We will be happy to discuss with you what works best based on your experiments and what you are cutting.

I get chattermarks on tissue slices. How can I achieve better slices?

The Compresstome is a unique tissue slicer with patented compression technology. It was made to produce slices faster than other market slicers without chattermarks. If you are getting chattermarks on your tissue slices, there are a few diagnostic keys you can try:

  1. Set the speed lower (try “Advance” setting of 1-1.5) and set the oscillation frequency higher (try setting of 3-4).
  2. Make sure that you are using 2-3% agarose, and that there are no air bubbles in the agarose surrounding the tissue.
  3. Ensure that the blade is lined up correctly with the specimen tube (within a few microns from it). If the blade is too far from the specimen tube, this will disrupt your slices.
  1. Try changing the cutting blade in case it has nicks on the edge that interfere with cutting.
  • Stainless steel blades should be swapped out after each use.
  • Ceramic cutting blades last a month or two, depending on how frequently you cut tissue.
  1. If you are working with tissue that have open cavities inside, make sure to inject/infuse the cavities with agarose or gelatin to ensure that all air spaces have been filled up.

If you cannot diagnose the problem based on these tips, give us a call or email and we will be happy to help!

I am getting uneven tissue slices of inconsistent thickness. How do I fix this?

If you are getting uneven tissue slices of inconsistent thickness, it may be that the ratio of agarose density to tissue density does not match. For example, agarose that is too soft (<2%) will not provide enough stability for firmer tissue (i.e. cardiac or lymph node tissue which is more fibrous) when being cut. This in result could produce chatter marks in slices. If this is happening, use a higher percent of agarose to accommodate the tissue (3%). Another fix for inconsistent slice thickness will be to lower the cutting speed (“Advance” to 1-1.5) and to increase the oscillation frequency (try 4-5).

What are the advantages of using a Compresstome vibrating microtome compared to other tissue slicers?

The advantages of the Compresstome outweigh other market slicers for many reasons. These reasons include:

  1. The speed of cutting while using a Compresstome is 5x faster than other market slicers! You will get superior slices, without chattermarks, using a speed that is faster than the competitors’ slicers. Other market slicers require slower speeds to reduce the amount of chattermarks on slices. With the Compresstome, you will get twice as much work done in half the amount of time as using other market slicers.
  2. The surface of slices using the Compresstome are much more clear, flat, and chattermark free! The Compresstome stabilizes tissue samples throughout the entire sectioning process using patented compression technology. In short, the Compresstome tissue slicer prevents damage to the tissue microstructure.
  3. The Compresstome has flexible temperature conditions compared to other market slicers that need to freeze the slices before they are sectioned. The Compresstome can section tissues from a range of temperatures (0 to 37 degrees celsius), without the need to freeze tissues before-hand.
  4. The protocol for the Compresstome is more simple and repeatable compared to other market slicers. The Compresstome tissue slicer only requires agarose tissue embedding before cutting. No liquid nitrogen freezing is necessary, like the other market slicers, saving you time and money on completing your experiments.
  5. We have models that are fully automated! Which means no more tedious wheel cranking for slices that other market slicers require.
  6. The Compresstome tissue slicer offers a wide range of tissue thicknesses, from 4µm to 1000 µm precision. Other market slicers have smaller ranges (5µm to 40µm), or can only cut larger thicknesses of tissue. Super thin slices are optimal for electron microscopy, which can expand your experimental possibilities!
  7. The Compresstome tissue slicer is portable and convenient. Weighing just under 12-15lbs, it can easily be moved throughout a lab by one person. Other market slicers are large (~300lbs) and need multiple people to move.
  8. The Compresstome tissue slicer offers superior quality slices at much lower prices than the other market slicers. Save money and get better results using the Compresstome!

The Compresstome tissue slicer has many advantages over other tissue slicers. With a wide range of slicing capabilities, it is ideal for many tissue types, animal types, and experiments. Contact us today to see how the Compresstome tissue slicer can benefit you!

What are your best-selling Compresstome® models?

Our VF-510-0Z is our most popular Compresstome® model. The VF-510-0Z is our newest Compresstome model and is fully automated. Our vibratome comes calibrated with Auto Zero-Z patented technology, which gives you healthier live slices and smoother fixed sections**. This model comes with a one-touch unlocking mechanism on the sliding control box that allows for rapid sample loading and cutting, saving you time.

**Our Compresstome VF-510-0Z vibratome is equivalent to the Leica VT1200S model. Our Auto Zero-Z Technology is patented and is equivalent to the VibroCheck. However, our Auto Zero-Z Technology is already included in the price of your VF-510-0Z!

What is the difference between the VF-210-0Z, VF-300, VF-510-0Z, and VF-800-0Z models?

The biggest differences among these models are the automation, warranty time, and Auto Zero-Z technology.

Compresstomes® with Auto Zero-Z technology have Z-axis vibration of less than 1 micron, as confirmed by a precision laser measuring system with 0.25 micron resolution. This low Z-axis vibration is possible due to the use of precision manufactured components, 100% inspection, and careful assembly methods. Unlike other slicers there are no adjustments to slip, and no Z-axis calibration necessary by the user. The Compresstome models VF-210-0Z, VF-510-0Z, and VF-800-0Z have this Auto Zero-Z technology.

The Compresstome® VF-300 and VF-510-0Z models are fully automated models, which means that there are both ‘Single’ and ‘Continuous’ cutting modes when operating them. The micrometer sits in the control box and automatically advances your sample forward to be cut, depending on the slice thickness display that the user sets on the control box. These units can cut either one slice at a time or continuous slices and the mode is easily set via a switch on the control box. For these reasons, the VF-300 and VF-510-0Z models are excellent options for producing super thin sections, down to ~10 µm however the VF-300 only has a 1-year warranty whereas the VF-510-0Z has an industry leading 5-year warranty.

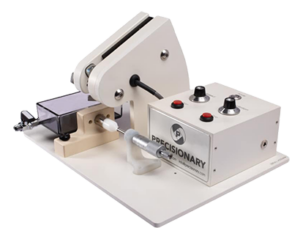
The VF-510-0Z has a sliding control box for easier access to removing and inserting the specimen tube. This means the buffer tray and the blade holder stays in place while you load the specimen. Additionally, the VF-510-0Z also has an oscillating motor cover to protect those oscillating parts from any aerosolized buffer solution coming in contact with it. This assists in the longevity of those moving parts. Because the control box is smaller in the VF-510-0Z, there is no display for the slice count or the total µm distance.

On the other hand, the VF-210-0Z is a semi-automated model meaning it can only cut one slice at a time. There is no continuous cutting mode as this model’s micrometer is a manual dial that the user needs to turn to their desired slice thickness in between each slice that is produced. Because of this manual micrometer, this model is recommended for fresh tissue slicing or producing sections >20 µm. The VF-210-0Z also has a 5-year warranty.

The VF-800-0Z is a vibrating microtome that is designed for sectioning the tissue of larger samples. It is also the only vibratome that can section large organs without freezing. With a diameter of up to 100mm, it allows the brain sectioning of cats, dogs, pigs, and monkeys. Many neuroanatomy and neuropathology experiments require sectioning entire brains from these animals. The VF-800-0Z is capable of sectioning slices for these large primates down to 40 microns. It produces even and consistent slices and it’s 5X faster than other vibratomes on the market. It also has our patented compression technology and agarose embedding process that eliminates chattermarks. The patented Auto Zero-Z technology reduces Z-axis deflection to <4 μm. The VF-800-0Z has a 1-year warranty.
I want a fully automated model, should I choose the VF-300 or the VF-510-0Z model?

Both of these models are fully automated, utilize a sliding control box for ease of loading and unloading the specimen tube and are built under strict QA procedures. The most significant differences between these models is the Auto Zero-Z technology and the warranty time, and their recommended experimental applications.

The VF-510-0Z is precisely aligned during manufacturing to eliminate any deviations in the Z-axis during the cutting process.  This patented technology results in “zero Z-axis” stability that helps to produce slices with smooth surfaces that are even and filled with healthy cells. Another key feature of the VF-510-0Z is the oscillating motor cover which protects the oscillating parts from any aerosolized buffer solution coming in contact with it. This assists in the longevity of those moving parts.

In addition, the VF-510-0Z has a 5-year warranty which is the best in the industry.  The VF-300 has a 1 year warranty which is an industry standard.

Finally, we recommend the VF-510-0Z as the key model for electrophysiology experiments, precision-cut tissue slices, and organotypic culture slices.

Compresstome Model Comparison Chart

Model

Min. slice thickness

Cutting mode

Slice thickness adjustment

Available specimen tube sizes

Includes Auto Zero-Z technology

10 µm

Automatic

Automatic 15.5mm, 20 mm

15 µm

Automatic Manual 15.5mm, 20 mm

40 µm

Automatic Automatic 100mm

10 µm

Automatic Manual 15.5mm, 20 mm

What size specimen tubes do you offer for your Compresstome® models?

Our VF-510-0Z is our most popular Compresstome® model. The VF-510-0Z is our newest Compresstome model and is fully automated. Our vibratome comes calibrated with Auto Zero-Z patented technology, which gives you healthier live slices and smoother fixed sections**. This model comes with a one-touch unlocking mechanism on the sliding control box that allows for rapid sample loading and cutting, saving you time.

**Our Compresstome VF-510-0Z vibratome is equivalent to the Leica VT1200S model. Our Auto Zero-Z Technology is patented and is equivalent to the VibroCheck. However, our Auto Zero-Z Technology is already included in the price of your VF-510-0Z!

What is the maximum length of tissue that can fit in a specimen tube?

For the Compresstome® VF-210-0Z, VF-300, and VF-510-0Z models, the maximum length of tissue you can fit within the specimen tube is 2.5 cm.

What do I do if the white plunger gets stuck inside the stainless steel specimen tube?

If the white plunger gets stuck inside the stainless steel specimen tube, do not worry! This is an easy fix, all you need is a few drops of acetone. Simply drop a few drops of acetone into the specimen tube, or take a paper towel dipped in acetone and scrub the specimen tube. This will clean the glue off the plunger, releasing it from the specimen tube!

The white plunger gets stuck when an excess of glue builds up on the plunger. To avoid this getting stuck in the future, make sure you are only using a drop or two of glue when gluing your tissues onto the white plunger. We recommend 5 µL of glue to keep the tissue on the white plunger, without it building up over time.

The VF-510-0Z is precisely aligned during manufacturing to eliminate any deviations in the Z-axis during the cutting process.  This patented technology results in “zero Z-axis” stability that helps to produce slices with smooth surfaces that are even and filled with healthy cells. Another key feature of the VF-510-0Z is the oscillating motor cover which protects the oscillating parts from any aerosolized buffer solution coming in contact with it. This assists in the longevity of those moving parts.

In addition, the VF-510-0Z has a 5-year warranty which is the best in the industry.  The VF-300 has a 1 year warranty which is an industry standard.

Finally, we recommend the VF-510-0Z as the key model for electrophysiology experiments, precision-cut tissue slices, and organotypic culture slices.

Is agarose embedding safe? Can I use the Compresstome® without agarose embedding?

Yes, agarose embedding is safe when using the Compresstome®! This has been our protocol for over 15 years and has been tried and true in over hundreds of labs all around the globe. We provide low-melting agarose tablets with all Compresstome® orders (in our Starter Kit of consumables) as well as for purchase in quantities of 10, 20, 50 and 100 tablets. The agarose embedding is safe for all tissue types because of our protocol to use the chilling block immediately after embedding your sample within the metal tube. The chilling block gels the agarose and takes ~30 seconds or less to do; while keeping your sample at biologically safe temperatures throughout the entire process.

We do not recommend using the Compresstome® without agarose embedding as the agarose provides 360˚ stability within the specimen tube, aids in the compression technology, and ultimately assists in producing the high-quality sections the Compresstome® cuts.

**Our Compresstome VF-510-0Z vibratome is equivalent to the Leica VT1200S model. Our Auto Zero-Z Technology is patented and is equivalent to the VibroCheck. However, our Auto Zero-Z Technology is already included in the price of your VF-510-0Z!

Will the temperature of the agarose damage my tissue?

The temperature of the agarose will not damage your tissue. After heating up your agarose solution in 10 second bouts (heat, then shake, heat again & shake if necessary until the agarose is dissolved), it will need to be cooled for 5 minutes in a 32 degree C bath. Using agarose with a low transition temperature will keep the agarose in a “liquid-like” state, without it congealing at low temperatures. This is ideal for preparing your tissue samples, because the agarose will be ready when it’s time to section the possible several different specimens for sectioning. The agarose tablets we provide are ideal for embedding tissue samples, as they help produce consistent slices throughout sectioning and eliminate weighing agarose for individual experiments.

What agarose concentration should I use for embedding tissue?

The agarose concentration needed for embedding tissue depends on the volume of buffer or water solution you want to use. If you want a stronger gel strength, you will add a higher concentration of agarose.

We provide 10 agarose tablets with our Starter Kits (also can be found in our E-Store). Each tablet contains 0.5 mg of agarose. We recommend 1 tablet of agarose for 25 mL of buffer/water solution, which gives you 2.0% concentration of agarose in your solution for embedding.

Using less or more buffer/water solution? Not a problem! We are happy to assist you in finding the concentration of agarose that suits your embedding needs. Contact us today!

The white plunger gets stuck when an excess of glue builds up on the plunger. To avoid this getting stuck in the future, make sure you are only using a drop or two of glue when gluing your tissues onto the white plunger. We recommend 5 µL of glue to keep the tissue on the white plunger, without it building up over time.

The VF-510-0Z is precisely aligned during manufacturing to eliminate any deviations in the Z-axis during the cutting process.  This patented technology results in “zero Z-axis” stability that helps to produce slices with smooth surfaces that are even and filled with healthy cells. Another key feature of the VF-510-0Z is the oscillating motor cover which protects the oscillating parts from any aerosolized buffer solution coming in contact with it. This assists in the longevity of those moving parts.

In addition, the VF-510-0Z has a 5-year warranty which is the best in the industry.  The VF-300 has a 1 year warranty which is an industry standard.

Finally, we recommend the VF-510-0Z as the key model for electrophysiology experiments, precision-cut tissue slices, and organotypic culture slices.

How do I get my tissue slice to fall out of the agarose after I cut?

There are a couple of tricks that you can try to get your tissue slices to fall out of the agarose after they are cut. The first is to use a higher concentration of agarose, such as 3% or 3.5%. If the agarose concentration is firmer, then it is more likely to automatically fall off the tissue after each slice is cut.

The second option is to brush your tissue with a sucrose solution before embedding it in the agarose. Coating the tissue with sucrose gives the tissue an extra layer that allows the agarose to fall off easier after it is cut.

I want the tissue slice to stay in the agarose after I cut. Can I do that?

Yes, you can do that! Unlike the procedure of detaching the agarose from the tissue, keeping the agarose rim around the tissue is quite simple. To preserve the agarose rim around each tissue slice, use a slightly lower concentration of agarose, 1.5% to 1.8%. Keeping the agarose rim around the tissue helps keep the slices protected after cutting. This also allows for easy maneuvering of tissue slices to mount on slides without damaging the tissue itself.

The second option is to brush your tissue with a sucrose solution before embedding it in the agarose. Coating the tissue with sucrose gives the tissue an extra layer that allows the agarose to fall off easier after it is cut.

What is Agarose Embedding?

“What is agarose embedding?” is one of the most commonly asked questions among customers interested in the Compresstome® vibratome. Agarose embedding is the process of embedding your tissue sample with agarose solution before you cut tissue slices with the Compresstome® vibratome. It can take some getting used to at first, yet ultimately takes only a fraction of the user’s time for sectioning overall and aids in producing healthier and smoother tissue slices.

We do not recommend using the Compresstome® without agarose embedding as the agarose provides 360˚ stability within the specimen tube, aids in the compression technology, and ultimately assists in producing the high-quality sections the Compresstome® cuts.

**Our Compresstome VF-510-0Z vibratome is equivalent to the Leica VT1200S model. Our Auto Zero-Z Technology is patented and is equivalent to the VibroCheck. However, our Auto Zero-Z Technology is already included in the price of your VF-510-0Z!

Why Use Agarose?

The agarose tablets we provide (found here) are low-melting-point agarose. These agarose tablets make it easy for you to prepare agarose solution because they are pre-weighed, condensed tablets. After preparing your agarose solution, you will pipette the agarose over your tissue sample. Once the tissue is embedded, you will chill the agarose solution with a chilling block that is provided to create a Jell-O-like consistency. The agarose gel gives the tissue sample 360° stability inside the specimen tube, so your tissue sample will never fall off or shift positions throughout sectioning.

The agarose gel also aids in the unique compression technology that our Compresstome® vibratomes are known for. Agarose gel keeps the tissue stable during sectioning and assists with the slight compression of your tissue sample to create even, smooth, consistent slices filled with healthy cells every time you cut.

Will Agarose Harm My Tissue?

Using agarose will not harm your tissue. In fact, hundreds of users around the world own and use Compresstome® vibratomes. Some of them have used their model for 10+ years with great satisfaction. The Compresstome® vibratome was invented 14 years ago, and there has been a great deal of tests in-house and from scientists on both fresh and fixed tissue for agarose embedding. We have concluded that agarose does not harm either fixed or fresh tissue during the embedding process.

The agarose rim will not harm your tissue even after your slices are produced. You can easily remove the agarose rim surrounding your tissue after cutting it. There are two methods for this: the first is to dip your tissue sample into a 30% sucrose solution before embedding, allowing the rim to fall off after it is cut. The second method is to use a higher agarose concentration when preparing your solution. This will result in a firmer agarose gel; thus it will fall off when your slice falls into the buffer tray and buffer solution.

Agarose Tablet Details

Here are detailed specifications and suggestions for making agarose solution with our agarose tablets.

Agarose Tablet Specifications

Gel Strength

>1200 g/cm^2 (1%)
>2500 g/cm^2 (1.5%)

Gel Temperature

36C (1.5%)

Melt Temperature

88C (1.5%)

EEO

<0.13

Moisture Content

<10%

Sulfate

<0.20%

RNase/DNase

None Detected

Protease/Endonuclease

None Detected

Storage

Room Temperature

Buffer Tray Size

110 x 60 x 30 mm


Making Agarose Solution

Buffer volume requires to achieve agarose concentration:

Concentration

1 Tablet

2 Tablets

1%

50ml

100ml

1.5%

33ml

67ml

1.8%

28ml

56ml

2%

25ml

50ml

2.5%

20ml

40ml

3%

17ml

33ml

How do I clean the Compresstome®? Is the Compresstome® UV safe?

There are several ways to clean the Compresstome® and the parts of the machine. Including: The base of the machine can be cleaned with 70% isopropanol or 70% ethanol solution, as well as 10% bleach. The buffer tray and specimen tube adapter base can also be cleaned with 70% isopropanol, 70% ethanol, or 10% bleach solution. Do not use any higher concentrated/corrosive solutions when cleaning the buffer tray! The blade holder and specimen tubes can be cleaned by soaking in acetone. Specifically, our Compresstome® models include a blade holder bath/acetone bath for easily cleaning the blade holders. Yes, the Compresstome® is UV safe.

Are any of the Compresstome® parts autoclavable?

Yes! Our stainless steel buffer tray is available on our E-Store for purchase and is autoclavable. You may also autoclave the blade holders.

How do I keep the solution cold during slicing?

When cutting with the Compresstome®, the sections fall into a buffer tray as they are free floating. There are several ways to keep the solution cold during cutting, including:

  • Place ice cubes directly in the buffer tray, as the vibrations of the blade holder will repel them from the sections being cut.
  • Place an ice pack underneath the buffer tray, as there is some space between the bottom of the buffer tray and the top of the base unit.
  • Replace your standard, polycarbonate buffer tray by purchasing one of our double wall buffer trays, which include a second wall for placing crushed/ice to keep your solution cold throughout the cutting process.

What is the volume of buffer solution needed in the buffer tray?

You want the solution in the buffer tray to fully cover the specimen tube in order to produce the best results, which means that the buffer tray will be filled to the brim with solution. You will need 210 mL of solution to fill the buffer tray when working with the 20 mm specimen tubes, and 215 mL of solution to fill the buffer tray when working with the 15.5 mm specimen tubes.

What buffer solution can I use in the Compresstome® buffer trays?

The solution you choose to use is based on your experiments. While PBS is the most commonly used buffer solution, many who are cutting fresh brain tissue will use aCSF, or those slicing liver or kidney will use KHB solution.

What if my Compresstome® is not functioning optimally?

The simple answer is, contact us! We are happy to help troubleshoot your cutting parameters, as many low-quality sectioning issues are due to:

  • The agarose concentration: too firm or too soft agarose concentration will interfere with how the samples are held in the agarose and how they exit the specimen tube to be cut (you want the firmness of your agarose to match the firmness of your tissue samples).
  • The cutting speed: a cutting speed that is too high will likely shred the sections as they are cut, will drag the tissue out of the specimen tube, or produce inconsistent slice thicknesses where the slices are thicker at the edges of the section. A cutting speed that is too low will not cut through the sample all of the way depending on the firmness of the sample, or pull the sample out of the agarose when it is cut.
  • The oscillation frequency: A vibration frequency that is too high will result in chatter marks on the produced sections and can also interfere with the consistency of the produced slice thickness. A vibration frequency that is too low will not cut through the entire sample all of the way, especially if the sample is too firm.
  • The cutting blades: The stainless steel blades need to be replaced every 1-3 experiments. For firm samples, or for higher section quality, we recommend the ceramic or tungsten carbide blades.

If you find that the issues persist after adjusting the cutting parameters, please call or email us with a description of the problem and the serial number of the model ready. Repairs typically take 1-2 weeks to complete and send back to the customer upon receipt of the model in our facilities.

What if I need to section large pieces of tissue? Do you have a large vibratome?

For large pieces of tissue, we recommend the VF-800-0Z. It is our largest Compresstome model. Our VF-800-0Z is the only vibrating microtome in the industry that can slice larger tissue, such as sectioning of non-human primate brains, without the need to freeze the tissue. The diameter of the VF-800-0Z is nearly 100 mm and has a depth of 90 mm, which can help with neuroanatomy and neuropathology research for whole slicing from up to 2000 µm down to 40 µm. The tissue is sliced horizontally with a vibrating razor blade at a 20 degree angle at a single or continuous cutting mode. We offer a 1-year warranty for the VF-800-0Z and our patented Auto Zero-Z technology is included. This means that there is no Z-axis calibration required by the user which helps speed up the slicing process.

What is the Compresstome VF-800-0Z model?

The VF-800-0Z is a vibrating microtome that is designed for sectioning the tissue of larger samples. It is also the only vibratome that can section large without freezing. With a diameter of up to 100 mm, it allows the fresh brain tissue sectioning of cats, dogs, pigs, and monkeys. Many neuroanatomy and neuropathology experiments require sectioning entire brains from these animals. The VF-800-0Z is capable of sectioning slices for these large primates down to 40 microns. It produces even and consistent slices and it’s 5X faster than other vibratomes on the market meaning that it has the ability to produce large through-put sections. It also has our patented compression technology and agarose embedding process that eliminates chattermarks and reduces Z-axis deflection to <4 μm.

What is the difference between stainless steel blades and ceramic blades?

Stainless steel blades and ceramic blades work just the same for your slicing needs. The difference is how often these blades need to be replaced. Stainless steel blades need to be swapped out after every experiment to yield best results. They can last up to 3-5 days at most depending on the frequency of use of your Compresstome. On the other hand, ceramic blades can last up to 3 weeks depending on Compresstome use. We highly recommend these blades, as they last much, much longer than stainless steel blades. The disadvantage of ceramic blades is that if any slight nicking appears on the blade surface, this can dramatically impact your slices.

Tissue Slicing Parameters for the VF-510-0Z and VF-210-0Z.

These are suggested slicing parameters for the Compresstome® vibrating microtomes VF-510-0Z and VF-210-0Z. Please note that you may need to adjust these settings to optimize tissue sectioning for your own experiments.

Tissue or Sample

Advance (Speed)

Oscillation (Frequency)

Suggested Agarose Concentration (%)

Lung: Precision-cut lung slices (PCLS)

2-3

3-4

2%

General fixed tissues

1.5-2

3-4

2%

Brain (live)
Electrophysiology
Imaging

15.-2

3-4

1.8-2%

Organotypic slices:
Tumor research
Cultured slices

2-3

4-5

2%

Retina (fixed or acute slices
*Infuse with agarose or gelatin to replace vitreous humor

1.5-2

5-6

2.5%

Kidney (acute slices)

3-4

5-6

2.5%

Liver (acute slices)

Liver (acute slices)

3-4

5-6

2.5%

Cardiac (fixed or acute slices
*Infuse with agarose or gelatin to fill atria/ventricle

1.5-2

5-6

Gut (fixed or acute slices)

3-4

3-4

2.5%

Plants (leaves and stems)

3-4

4-5

2%

Plants (seeds)

6-8

2-3

2.5%

Skin (epidermis)

2-3

5-6

2.5%

Muscle (fixed or acute slices)

2-3

4-6

2.5%

Adipose (fixed or acute slices)

4-5

5-6

1.8%

Lymph node (fixed or acute slices)

1.5-2

5-6

2.5%

Spleen (fixed or acute slices)

3-4

6-7

2%

Polymers or hard materials (for paint analysis, matrices, etc)

We recommend that you use a rotary microtome for hard material sectioning. Check out our product line of high-quality rotary microtomes here.


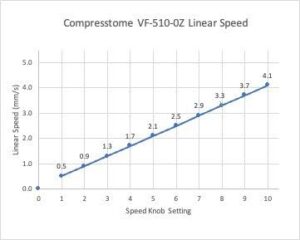
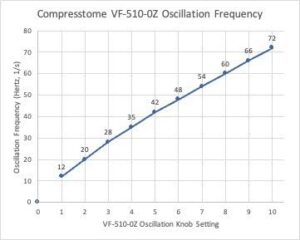
Speed & Oscillation (Frequency) Settings for the Compresstome.

Below are speed and oscillation (frequency) conversions for Compresstome® VF-510-0Z vibratomes. The graphs help identify the linear speed (mm/s) and oscillation frequency (Hz) of the control box parameters.

Compresstome VF Linear speedCompresstome VF Frequency

If you would like guidance on slicing parameters, speed and oscillation settings for other Compresstome(R) models, please contact us.

What are “rotary microtomes?

Rotary microtomes are routinely used for making paraffin-wax embedded tissue sections for histology and pathology. Because they are used for high volume sectioning, rotary microtomes need to be robust.

Precisionary Instruments offers a full line of high quality rotary microtomes for histopathology, research, and clinical purposes. Our microtomes give you reliable sections over a range of tissue slice thicknesses.

What is a rotary microtome and what is it typically used for?

A rotary microtome is a type of microtome that cuts thin sections by moving the sample up and down across a cutting knife. The samples are usually held in a specimen head. The up-and-down movement of the specimen head is controlled by a handwheel—hence that “rotary” name! Rotary microtomes are typically used for cutting tissue samples embedded in paraffin wax. These are usually tissues obtained from surgical biopsies for histopathological analysis. Thus, rotary microtomes are commonly used in histology and pathology studies.

In general, how do I operate a rotary microtome?

To operate a rotary microtome, you would first insert a low-profile or high-profile blade into the blade holder on the knife block. Then, make sure the blade guard is lifted to protect your hands from the blade. Next, insert your paraffin wax cartridge containing your sample into the specimen clamp. Then, you will use either a coarse wheel (in manual models) or press a button (in semi-automatic and automatic models) to advance the specimen clamp toward your knife block. Select the desired thickness of your slices and start sectioning to your desired area.

Does Precisionary offer rotary microtomes for purchase?

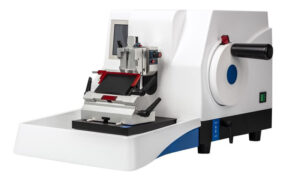
Yes, here at Precisionary Instruments, we currently carry three (3) types of rotary microtomes. The RF-600 which is our manual model, the RF-800 which is our semi-automatic model, and the RF-1000 which is our fully automated model. More information on those models can be found below.

What is the difference between the rotary microtome models from Precisionary Instruments?

We carry three (3) types of rotary microtomes. These are the RF-600, RF-800, and RF-1000 models.

  • The RF-600 is a manual model. This means that moving the specimen head forward and backward is done manually. Faster movement can be achieved using a coarse handwheel located on the left hand side of the RF-600 rotary microtome. Cutting movements using the handwheel are also done manually.
  • The RF-800 is a semi-automated rotary microtome. This means that the forward and backward movement of the specimen head can be controlled electronically. You can advance your sample using controls on the LCD screen, and there are fast, slow, and single “click” movements. Cutting movements using the handwheel is done manually.
  • The RF-1000 is a fully automated rotary microtome. This means that movement of the specimen head, as well as cutting, can both be completed electronically and automatically!

There are additional differences in the technical specifications of these 3 rotary microtome models, which you can explore in detail here.

What is the warranty for rotary microtomes from Precisionary Instruments?

We offer a full three (3) year warranty that covers all rotary microtome models. The warranty covers parts, shipping, repairs, and labor fees should there be any defect in the rotary microtome unit that is due to manufacturing. However, the warranty does not cover any defects resulting from improper use.

Do you offer annual service plans or maintenance services for your rotary microtomes?

Yes! We offer an annual service plan that covers your rotary microtome’s maintenance and care after your warranty period ends. The Annual Service Plan comes in two different tiers: 1) Basic Plan, and 2) Premium Plan. Each annual service plan covers all repair labor fees and maintenance costs, including parts, accessories, and shipping fees. Think of the annual plan as providing an extended year of warranty coverage. This helps give you peace of mind!

What consumables will I need to operate the rotary microtome?

There are three different consumables needed to operate your rotary microtome

  • Rotary microtome cutting blades: we offer  Low-Profile cutting blades. Each dispenser box includes 50 individual blades. We send you a free box of blades free with your microtome purchase.
  • Metal molds for tissue preparation: we offer a pack of 12 metal molds for tissue preparation. In the pack, there are three of each size below:
    • 1 cm x 1 cm
    • 2 cm x 2 cm
    • 1.5 cm x 2.5 cm
    • 2.5 cm x 3.8 cm
  • Plastic embedding cassette: we offer rotary microtome plastic cassettes (bottom and lid)

How is a hot water bath used with the rotary microtome for collecting tissue sections?

A hot water bath is essentially a paraffin section flotation bath that helps handle sectioned samples in histology and pathology laboratories. The hot water bath is filled with hot or warm distilled water, which allows for meticulous manipulation of cut tissue sections onto glass slides. These flotation baths are designed to prevent wrinkling and distortion of thin paraffin-wax embedded sections after they are cut and before they are mounted onto glass slides.

What are the components of the knife block?

The knife block comes with 3 components. These components are below:

  • Bottom component: allows for assembly onto microtome base. Slides backwards and forwards.
  • Middle component: allows for blade angle adjustment. We recommend a cutting angle of ~2 degrees for optimal tissue sectioning and collecting histology ribbons.
  • Top component: the cutting stage with the blade guard and blade ejector

Where can I find and buy additional parts and consumables for my rotary microtome?

Additional parts and consumables for rotary microtomes are found here.

They can be purchased via the E-Store on our website or through a purchase order generated from a quote established from a direct email or quote inquiry box found on our website here.

What consumables will I need to operate the rotary microtome?

There are three different consumables needed to operate your rotary microtome:

  • Rotary microtome cutting blades: we offer  Low-Profile cutting blades. Each dispenser box includes 50 individual blades. We send you a free box of blades free with your microtome purchase.
  • Metal molds for tissue preparation: we offer a pack of 12 metal molds for tissue preparation. In the pack, there are three of each size below:
    • 1 cm x 1 cm
    • 2 cm x 2 cm
    • 1.5 cm x 2.5 cm
    • 2.5 cm x 3.8 cm
  • Plastic embedding cassette: we offer rotary microtome plastic cassettes (bottom and lid)

How is a hot water bath used with the rotary microtome for collecting tissue sections?

A hot water bath is essentially a paraffin section flotation bath that helps handle sectioned samples in histology and pathology laboratories. The hot water bath is filled with hot or warm distilled water, which allows for meticulous manipulation of cut tissue sections onto glass slides. These flotation baths are designed to prevent wrinkling and distortion of thin paraffin-wax embedded sections after they are cut and before they are mounted onto glass slides.

What are the components of the knife block?

The knife block comes with 3 components. These components are below:

  • Bottom component: allows for assembly onto microtome base. Slides backwards and forwards.
  • Middle component: allows for blade angle adjustment. We recommend a cutting angle of ~2 degrees for optimal tissue sectioning and collecting histology ribbons.
  • Top component: the cutting stage with the blade guard and blade ejector

Where can I find and buy additional parts and consumables for my rotary microtome?

Additional parts and consumables for rotary microtomes are found here.

They can be purchased via the E-Store on our website or through a purchase order generated from a quote established from a direct email or quote inquiry box found on our website here.

What sets the Precisionary Cryostat CF-6100 apart from other cryostats on the market?

The Precisionary Cryostat CF-6100 stands out with its combination of precision, user-friendly design, and advanced features, making it suitable for diverse research and clinical applications. Key features include:

  • Steady and Swift Cooling: The CF-6100 boasts efficient cooling through a high-quality compressor and rapid Peltier stations, ensuring temperature stability for consistent sectioning.
  • Enhanced Sectioning Precision: Powered by precise motors and robust guide rails, it delivers uniform sections for various tissue types and heavy workloads.
  • User-Friendly Touchscreen Interface: A spacious 7-inch touchscreen and side control panel provide easy access to settings, enhancing usability.
  • Rapid and Efficient Chamber Drying: The unique drying function prevents frosting and expedites moisture removal, saving time compared to manual methods.
  • Built-in UV Disinfection: The integrated UV sterilization ensures a sterile sectioning environment and offers flexible scheduling or manual activation.
  • Adjustable Blade Holder & Anti-Roll Plate: Compatible with both high- and low-profile blades, the blade holder features lateral movement and adjustable angles for optimal sectioning, while the anti-roll plate prevents curling of tissue sections.

What control features does the CF-6100 offer?

The CF-6100 provides the following advanced control features:

  • Digital Temperature Control: With an adjustable range to achieve optimal cooling, the chamber temperature is easily controlled for various tissue types and sectioning needs.
  • Section Thickness Adjustment: Allows for fine-tuning of section thickness from 1 µm to 50 µm in precise increments, supporting applications such as histopathology, immunohistochemistry, and research studies.
  • Defrost & UV Disinfection Cycles: Equipped with automated cycles for efficient chamber drying and UV disinfection to maintain sterility between uses.
  • Specimen Holder and Blade Control: The CF-6100’s motorized specimen head positioning enables easy sample adjustments, while the blade holder offers safe blade removal, lateral movement, and angle adjustments to optimize the sectioning process.

How do I set the temperature for sectioning different types of tissues?

Proper temperature settings depend on the type of tissue being sectioned. Here’s a general guideline:

  • Soft tissues (e.g., brain, liver): These typically require lower temperatures, around -20°C to -25°C, to maintain structural integrity during sectioning.
  • Harder tissues (e.g., bone, cartilage): These may require slightly higher temperatures, typically around -10°C to -15°C, to avoid cracking and ensure smooth sectioning.
  • General rule: For thin, delicate sections (below 5 µm), colder temperatures are better, while thicker sections may allow for higher temperatures. Make sure to monitor the temperature on the digital display, and always pre-cool the chamber and specimen before sectioning to avoid temperature fluctuations.

What are the proper steps to prepare and load a sample for sectioning?

Follow these steps to ensure optimal sectioning:

  1. Freezing the sample: Use OCT or another embedding medium to fully cover the tissue sample. Freeze it at the optimal temperature for the tissue type.
  2. Mounting the sample: Secure the frozen sample into the specimen head of the cryostat. Ensure it is aligned correctly and tightly fixed to avoid shifting during sectioning.
  3. Blade positioning: Adjust the blade to the correct angle (typically around 10°–15°) to minimize drag and prevent artifacts like chatter marks.
  4. Temperature setting: Ensure the cryostat chamber has reached the desired temperature before you begin slicing.
  5. Begin sectioning: Use the handwheel for manual sectioning or the automated sectioning feature to make continuous, consistent slices.

Why am I getting chatter marks on my frozen sections, and how can I fix it?

Chatter marks can be caused by several factors. Here are potential causes and solutions:

  • Blade Issues:
    • A dull or worn blade may cause vibrations that lead to chatter marks. Try replacing the blade with a sharp one.
    • Ensure the blade is securely fastened. Even slight movement can cause irregularities.
  • Sample Temperature:
    • If the sample is too cold, it becomes brittle, leading to chattering. Try slightly raising the temperature by 2-3°C to see if that reduces the issue.
    • Conversely, if the sample is too warm, it may become too soft, causing the blade to drag. Lower the temperature in small increments and test again.
  • Cutting Speed:
    • Slow down the cutting speed to reduce vibrations. If you’re using the automatic sectioning function, try adjusting the speed setting to a lower level.
  • Blade Angle:
    • Adjust the blade angle slightly to reduce drag on the tissue. A 10°–12° angle is often optimal.

I am getting alternating thick-and-thin sections. How can I resolve this?

Alternating thick-and-thin sections usually indicate an issue with stability. Here’s what you can check:

  • Specimen Stability:
    • Ensure the specimen is securely mounted. If it’s loose, the tissue can shift during sectioning, causing irregular section thickness.
    • Recheck the positioning of the sample in the specimen holder.
  • Blade Sharpness:
    • A dull blade can create resistance during the cut, leading to inconsistent section thickness. Replace the blade if necessary.
  • Blade and Specimen Temperature:
    • Temperature fluctuations can cause sample inconsistency. Ensure that both the blade and the sample are at a stable and uniform temperature throughout the sectioning process.
  • Cutting Speed:
    • Try reducing the sectioning speed to allow for more consistent cutting.

The temperature of the cryostat isn’t reaching the target setting. What should I do?

If the cryostat is not reaching the set temperature, try the following steps:

  • Check for Frost Buildup:
    • Excessive frost or ice can prevent proper cooling. Run the defrost cycle and clean out any frost from the chamber.
  • Air Filter Maintenance:
    • Ensure that the air filters are clean and free from debris. Clogged filters reduce the efficiency of the cooling system.
  • Room Temperature:
    • Ensure the cryostat is in a well-ventilated room with a stable ambient temperature. Extremely warm environments can make it harder for the cryostat to reach low temperatures.
  • Service Check:
    • If issues persist, it may indicate a malfunction in the refrigeration unit. Contact Precisionary technical support for assistance.

How can I reduce frost buildup in the cryostat chamber during use?

Frost buildup can interfere with visibility and cooling efficiency. Here’s how to reduce it:

  • Keep the Chamber Closed: Avoid opening the cryostat chamber too frequently during use. Exposure to warm, humid air can cause condensation and frost buildup.
  • Use Defrost Cycles: Run the automatic defrost cycle regularly, especially if you notice ice accumulating. Manual defrosting can also help, depending on your usage frequency.
  • Dry Tissue Samples: Ensure that any tissue or embedding medium is thoroughly dry before placing it in the chamber. Wet materials can lead to condensation.

What does the warranty for the Precisionary Cryostat CF-6100 cover?

The CF-6100 comes with a 1-year warranty that covers:

  • Parts and Labor: Includes repairs or replacement of defective components, such as refrigeration units, electronic controls, and blade systems.
  • Technical Support: Access to expert troubleshooting and technical assistance.
  • Exclusions: Consumables like blades and routine maintenance tasks such as filter replacement are not covered under the warranty.

Can I purchase an extended service plan?

Yes, Precisionary Instruments offers extended service plans that include:

  • Annual Maintenance Checks: Regular inspection and servicing of your cryostat by a certified technician to keep it in top working condition.
  • Priority Support: Faster response times for technical assistance or repair requests.
  • Discounted Parts: Reduced pricing on replacement parts and consumables like blades.ibrating microtome, otherwise known as a vibratome. We call ours the Compresstome® because our models utilize a patented compression technology that no other tissue slicer on the market possesses. This technology works by cutting samples vertically instead of horizontally. More importantly, it uses a specimen tube that embeds tissue samples in low-melting agarose. The sample then exits the tube, and the blade cuts the sample right at the site of compression, creating even, consistent slices every time you cut.

What is the typical lead time for ordering a Precisionary Cryostat CF-6100?

The lead time from the date of order confirmation is typically 1-2 weeks.

What types of delivery options are available?

We offer the following delivery options:

  • Standard Delivery: The cryostat is shipped to the loading dock of your facility.
  • White Glove Delivery: Includes full service—unpacking, setup, and installation—at the destination. This is recommended if you require assistance with setting up the cryostat

Is training included when I purchase a CF-6100?

Yes, we offer both virtual and onsite training:

  • Virtual Training: A detailed session that covers setup, operation, and maintenance. This is included with all purchases.
  • Onsite Training (optional): Available for an additional fee, especially for institutions requiring hands-on assistance with operation and troubleshooting.

What are the general cleaning tips for the Precisionary Cryostat CF-6100?

Before performing any cleaning or maintenance, make sure to:

  • Power Off and Disconnect: Ensure the CF-6100 is turned off, and disconnect the main power supply before starting.
  • Authorized Access Only: Maintenance and repair should only be performed by authorized, qualified personnel.
  • Secure the Hand Wheel: Lock the hand wheel securely before cleaning.
  • Use Appropriate Cleaners: Clean using alcohol or alcohol-based disinfectants. Do not use corrosive solvents such as acetone or xylene as they can damage the instrument.
  • Avoid Liquid Exposure: Take care to prevent liquids from entering any part of the instrument during the cleaning process.

What daily maintenance should be performed on the CF-6100?

After each daily use, follow these steps:

  1. Lock the Hand Wheel: Securely lock the hand wheel to prevent accidental movement.
  2. Remove and Store Blades Safely: Remove the blade from the blade holder and return it to the blade box. Dispose of accumulated waste properly.
  3. Close Sliding Glass Door: Ensure the sliding glass door is closed to maintain cleanliness.
  4. Turn Off Interior Light: Switch off the interior light, but keep the main power switch on and the refrigeration system running.
  5. Clean Blade and Brush Holders: Clean these components as needed to ensure optimal performance.

How do I properly use and maintain the waste-collecting container?

The waste collecting container is intended for defrosting liquids, rinsing solutions, and other waste:

  • Pre-Fill with Disinfectant: Before use, fill the container with 200 ml of 10% formalin solution or another disinfectant to safely collect waste.
  • Dispose of Waste Responsibly: Dispose of wastewater following your institution’s waste discharge regulations. To remove the waste container, simply lift the bucket plate to detach the container and connected water pipe.
  • Regular Monitoring: Monitor the liquid level regularly and empty the container as needed, following proper waste disposal protocols

What precautions should I take when sectioning highly fragile or delicate tissues?

Sectioning fragile tissues like brain or lung requires extra care to avoid damage:

  • Lower the temperature: Use a slightly lower temperature to ensure that the tissue stays firm and doesn’t become mushy during sectioning.
  • Slow down the sectioning speed: Reducing the sectioning speed helps to avoid tearing or compressing the tissue.
  • Use a sharp blade: Always use a new or freshly sharpened blade to minimize drag and distortion.
  • Stabilize the sample: Ensure the specimen is securely mounted and properly aligned to reduce the risk of movement or uneven sectioning.

What are the storage recommendations for the CF-6100 when it’s not in use?

If you’re not using the cryostat for an extended period, follow these steps to store it safely:

  • Turn off and unplug the unit: Ensure the cryostat is powered down and disconnected from the power source.
  • Defrost and clean the chamber: Run a defrost cycle to remove any ice, then thoroughly clean the chamber, blades, and specimen holder.
  • Cover the cryostat: Use a dust cover or cloth to protect the unit from dust and debris.
  • Store in a cool, dry place: Avoid placing the cryostat in areas with extreme temperatures or high humidity, as this could affect the refrigeration unit and electronics.
  • Regular checks: Even in storage, inspect the unit periodically to ensure there’s no buildup of dust or humidity, which could affect its performance when next in use.

How do I ensure the cryostat remains free of contamination between samples?

To prevent contamination between samples, particularly in clinical or research settings, follow these best practices:

  • Use UV Disinfection: The built-in UV disinfection cycle can be run after each session to sterilize the chamber.
  • Clean the specimen holder and blade regularly: Thoroughly clean all tools and components that come in contact with the tissue, such as forceps and specimen holders, between each use.
  • Cover or remove unused components: If you’re not sectioning, keep the blade and other components covered or stored in a sterile environment to minimize exposure to contaminants.
  • Use sterile forceps and gloves: Always handle samples and cryostat components with sterile tools and gloves to avoid introducing external contaminants.

What makes the Precisionary Tissue Embedding Center TEC-200 unique compared to other embedding centers?

The TEC-200 stands out due to its precise temperature control, ergonomic design, and advanced features that streamline the tissue embedding process. Key features include:

  • Independent Temperature Zones: The TEC-200 offers precise control over the paraffin reservoir, working platform, and mold warmer, allowing users to maintain ideal conditions for each part of the embedding process.
  • Large Paraffin Capacity: Its 4-liter paraffin reservoir reduces the need for frequent refills, making it ideal for high-throughput labs.
  • LED Lighting: Bright LED illumination over the work area ensures optimal visibility during embedding, reducing the risk of errors.
  • Foot-Pedal Control: For hands-free operation, the TEC-200 features a foot pedal that allows you to dispense paraffin without interrupting the embedding process.

What are the main applications of the TEC-200?

The TEC-200 is designed for both research and clinical labs requiring efficient and consistent paraffin embedding of biological tissues. Applications include:

  • Histopathology: For preparing tissue blocks for microtome sectioning.
  • Immunohistochemistry: Embedding tissues in paraffin to preserve sample morphology for antibody staining.
  • Molecular Biology: Preparing tissue samples for nucleic acid extraction after sectioning.

How do I set up the TEC-200 for tissue embedding?

Setting up the TEC-200 is straightforward. Follow these steps for optimal use:

  1. Turn on the device: Switch on the TEC-200 and allow it to reach the pre-set temperatures for the paraffin reservoir, working platform, and mold warmer.
  2. Fill the Paraffin Reservoir: Melt your paraffin in a separate container and pour it into the 4-liter reservoir. The TEC-200 will maintain it at the desired temperature.
  3. Set temperature zones: Adjust each temperature zone independently using the control panel.
  4. Begin embedding: Using forceps, place your tissue sample into the mold, position it properly, and use the foot pedal to dispense paraffin evenly over the sample.
  5. Solidify the paraffin: Once embedded, transfer the mold to the cold plate or let the paraffin solidify at room temperature.

How do I maintain consistent paraffin embedding for larger batches?

For batch embedding, ensure the following:

  • Pre-warm molds: Keep molds in the mold warmer before embedding to prevent paraffin from cooling too quickly when poured.
  • Maintain consistent paraffin temperature: Check the paraffin reservoir regularly to ensure it stays within the optimal temperature range (60°C–65°C) for smooth, even flow.
  • Use the LED lighting: Ensure the work area is well-lit so that you can clearly see the tissue’s position and paraffin distribution.

The paraffin is not dispensing smoothly. What could be the issue?

There are a few potential reasons for paraffin dispensing issues:

  • Temperature too low: Check the paraffin reservoir’s temperature. If it’s below 60°C, the paraffin may solidify and become difficult to dispense. Raise the temperature slightly and allow it to melt fully before use.
  • Clogged dispensing nozzle: Paraffin buildup in the nozzle can prevent smooth flow. Turn off the TEC-200, clean the nozzle with a heated tool, and remove any blockages.
  • Foot pedal malfunction: If the foot pedal isn’t working properly, ensure that the connection is secure and the pedal is functioning correctly. If the problem persists, switch to manual dispensing and contact technical support for further troubleshooting.

The paraffin is cooling too quickly in the molds. How can I fix this?

Rapid cooling of paraffin can result in uneven embedding or gaps. Here’s how to prevent it:

  • Preheat molds: Always keep molds in the mold warmer until immediately before use. Cold molds can cause the paraffin to cool and harden prematurely.
  • Increase mold warmer temperature: Ensure the mold warmer is set to the upper range of its temperature (around 55°C–60°C) to keep molds warm enough for embedding.
  • Check paraffin temperature: Make sure the paraffin in the reservoir is within the ideal range of 60°C–65°C.

The working platform temperature seems inconsistent. What should I do?

Inconsistent platform temperature can disrupt the embedding process. To resolve this:

  • Check temperature settings: Verify that the platform temperature is set correctly (typically 50°C–55°C) and matches the control panel’s reading.
  • Ensure proper ventilation: Make sure the TEC-200 is in a well-ventilated area. If the environment is too cold, it can affect the platform’s ability to maintain consistent heat.
  • Contact support: If the platform temperature continues to fluctuate, there may be an issue with the heating element. Contact Precisionary Instruments for technical assistance.

What is covered under the warranty for the TEC-200?

The TEC-200 comes with a 1-year warranty, which includes:

  • Parts and Labor: Covers the repair or replacement of faulty components, such as heating elements, temperature controls, and the paraffin dispensing system.
  • Technical Support: Full access to Precisionary’s customer service team for troubleshooting and guidance.
  • Exclusions: The warranty does not cover consumables, such as paraffin or wear-and-tear parts like forceps and molds.

Are extended service plans available?

Yes, Precisionary Instruments offers extended service plans that include:

  • Annual Inspections: A certified technician will perform maintenance checks to ensure your TEC-200 is operating optimally.
  • Discounted Parts: Extended plans offer discounts on replacement parts, including temperature sensors and heating elements.
  • Priority Support: Receive faster response times for technical inquiries and repairs.

What is the lead time for the TEC-200?

Lead times for the TEC-200 vary based on order volume and customization, but typically fall within 1-2 weeks.

What delivery options are available for the TEC-200?

Precisionary Instruments offers several delivery options to meet your needs:

  • Standard Shipping: The TEC-200 is shipped to the loading dock of your facility.
  • White Glove Delivery: This option includes full installation, unpacking, and setup of the embedding center.
  • International Shipping: Precisionary coordinates with trusted carriers for international orders to ensure safe and timely delivery.

Is training provided with the purchase of the TEC-200

Yes, we offer both virtual and onsite training:

  • Virtual Training: A comprehensive session on setup, operation, and maintenance of the TEC-200.
  • Onsite Training (optional): Available for an additional fee for users who require hands-on assistance with using the system.

What are the general guidelines for maintaining and cleaning the TEC-200 Paraffin Embedding Center?

Lead times for the TEC-200 vary based on order volume and customization, but typically fall within 1-2 weeks.

How should I clean the paraffin dispenser on the TEC-200?

Precisionary Instruments offers several delivery options to meet your needs:

  • Standard Shipping: The TEC-200 is shipped to the loading dock of your facility.
  • White Glove Delivery: This option includes full installation, unpacking, and setup of the embedding center.
  • International Shipping: Precisionary coordinates with trusted carriers for international orders to ensure safe and timely delivery.

What is the best way to clean the work surfaces of the TEC-200?

Yes, we offer both virtual and onsite training:

  • Virtual Training: A comprehensive session on setup, operation, and maintenance of the TEC-200.
  • Onsite Training (optional): Available for an additional fee for users who require hands-on assistance with using the system.

How do I clean the control panel of the TEC-200?

Clean the control panel weekly:

  • Dry Cloth Wipe: Use a dry, lint-free cloth to remove dust and debris.
  • Paraffin Removal: Gently remove any solidified paraffin using the cloth to avoid damaging the panel.

What are the steps to clean the paraffin tank?

Follow these instructions to maintain the paraffin tank:

  • Prevent Contamination: Ensure that no contaminants enter the tank.
  • Drain Residual Paraffin Properly: Drain paraffin through the dispenser, leaving a small residual amount to prevent solid contaminants from entering the tank.
  • Absorb Residual Paraffin: Use tissue or paper towels to absorb remaining paraffin, then clean the tank interior with a tissue.

How should I clean the forceps holder and paraffin collection trays?

Keep these components clean:

  • Forceps Holder: Weekly clean with a lint-free cloth dipped in an appropriate cleaning reagent to prevent contamination.
  • Paraffin Collection Trays:
    • Empty Regularly: Empty the trays while they are warm, and ensure they are emptied daily to avoid overflow.
    • Do Not Reuse Paraffin: Never reuse paraffin collected in the trays to prevent carry-over contamination.
  • Prevent Overflow & Damage: Regular emptying helps avoid potential overflow and damage to the instrument.

What precautions should I take when cleaning the TEC-200 Cold Plate?

To maintain the cleanliness and functionality of the cold plate:

  • Power Off and Unplug: Ensure the instrument is switched off and unplugged before cleaning.
  • Use Suitable Cleaners: Use standard lab products suitable for paraffin removal and avoid prolonged contact with organic solvents.
  • Clean the Surface: Wipe the surface with a dry, lint-free tissue to remove any condensed water.
  • Exterior Cleaning: For painted surfaces, use a mild household cleaner or soapy water; avoid xylol, acetone, or alcohol.

Can I use third-party paraffin in the TEC-200?

While third-party paraffin can be used, it is recommended to use high-quality paraffin with a melting point between 60°C and 65°C for best results. Using low-grade paraffin may result in inconsistent embedding or clogging of the dispensing system.

What is the best way to store the TEC-200 when not in use?

When not in use for an extended period, it’s important to properly store the TEC-200 to maintain its functionality:

  • Turn off and unplug the unit: Ensure the TEC-200 is powered off and unplugged from the wall outlet.
  • Clean thoroughly: Remove any remaining paraffin from the reservoir, working platform, and dispensing system. Clean all surfaces with ethanol to prevent paraffin residue from hardening and damaging components.
  • Cover the unit: Use a dust cover or clean cloth to protect the unit from dust and debris. This helps preserve the integrity of the heating elements and other sensitive components.
  • Store in a temperature-controlled environment: Avoid storing the TEC-200 in areas with extreme temperatures or high humidity, as this could affect its electronic components.

How do I ensure even paraffin embedding for fragile samples like small tissue fragments?

Embedding fragile tissues like small fragments requires extra care to avoid tissue distortion:

  • Pre-warm the tissue molds: This prevents the paraffin from cooling too quickly, which can distort small or delicate tissue fragments.
  • Use forceps gently: Carefully place the tissue in the mold using fine-tipped forceps. Handle the tissue as little as possible to maintain its structural integrity.
  • Control paraffin flow: Use the foot pedal to dispense the paraffin slowly and steadily, ensuring even distribution over the tissue without introducing air bubbles or causing the tissue to float.

Can I embed multiple samples in one mold?

Yes, you can embed multiple samples in a single mold, but there are a few considerations to ensure proper embedding:

  • Size uniformity: Make sure the tissue samples are relatively uniform in size to avoid uneven sectioning later on.
  • Adequate spacing: Ensure the samples are spaced apart so that each one is fully surrounded by paraffin. This helps maintain the structural integrity of each sample during sectioning.

Does the TEC-200 have an energy-saving mode?

Yes, the TEC-200 features an energy-saving mode that allows it to reduce power consumption when not actively embedding. After a set period of inactivity, the unit will lower the temperature of the paraffin reservoir and mold warmer, which can then quickly be returned to full temperature when you are ready to begin embedding again. This feature helps extend the lifespan of the equipment while also conserving energy.

For even more resources, visit our blog to read articles on tissue sectioning protocols, real lab examples, and experimental solutions. If you’d like to get immediately in touch with a tissue sectioning expert, please complete the form below. 

Talk to a Tissue Sectioning Expert

Still have questions about tissue sectioning? We can help. Fill out the form, and our team will get back to you within one business day.